Last Update 20 hours ago Total Questions : 75
The Jira Administration for Cloud content is now fully updated, with all current exam questions added 20 hours ago. Deciding to include ACP-120 practice exam questions in your study plan goes far beyond basic test preparation.
You'll find that our ACP-120 exam questions frequently feature detailed scenarios and practical problem-solving exercises that directly mirror industry challenges. Engaging with these ACP-120 sample sets allows you to effectively manage your time and pace yourself, giving you the ability to finish any Jira Administration for Cloud practice test comfortably within the allotted time.
Your Jira Cloud instance has hundreds of company-managed projects which are used only by the development team at your organization. All projects share a single permission scheme. New business requirements state:
• Customer support staff at your organization need to view all issues in all the projects.
• They also need to share filters with other users.
• They should not be granted too much access.
Identify the appropriate way to configure customer support staff in Jira.
As a new group
As a security level
As a new project role
As a new permission
To meet the requirements of allowing customer support staff to view all issues in all company-managed projects, share filters, and avoid granting excessive access, configuring the staff as a new group (Option A) is the most appropriate approach. This allows the group to be granted specific permissions in the shared permission scheme and global permissions without requiring structural changes to the projects.
Explanation of the Correct Answer (Option A) :
Viewing all issues : All projects share a single permission scheme, which defines permissions like Browse Projects (required to view issues). By creating a new group (e.g., “Customer Support”), you can add this group to the Browse Projects permission in the shared permission scheme, granting customer support staff access to view issues in all projects.
Sharing filters : Sharing filters requires the Share dashboards and filters global permission. Adding the “Customer Support” group to this global permission allows staff to share filters with other users.
Minimal access : Using a group ensures that only the necessary permissions ( Browse Projects and Share dashboards and filters ) are granted, avoiding excessive access (e.g., editing issues, administering projects).
Exact Extract from Documentation :
Manage groups in Jira Cloud
Groups are used to manage user permissions efficiently across multiple projects.
To grant permissions to a group:
Create a new group in Settings > User management > Groups .
Add users to the group.
Add the group to permissions in the permission scheme ( Settings > Issues > Permission schemes ) or global permissions ( Settings > System > Global permissions ). Example : Add a group to the Browse Projects permission to allow members to view issues, and to the Share dashboards and filters global permission to share filters. Note : Groups are ideal for applying permissions across multiple projects with a shared permission scheme. (Source: Atlassian Support Documentation, "Manage groups in Jira Cloud")
Why This Fits : Creating a new group allows you to efficiently grant the Browse Projects permission (via the shared permission scheme) and the Share dashboards and filters global permission to customer support staff, meeting all requirements while keeping access minimal.
Why Other Options Are Incorrect :
As a security level (Option B) :
Security levels (part of an issue security scheme) restrict who can view specific issues within a project. The requirement is to grant visibility to all issues, not restrict it, so security levels are irrelevant. Additionally, security levels do not address sharing filters.
Extract from Documentation :
Issue security levels restrict issue visibility to specific users, groups, or roles. They are not used to grant broad access like viewing all issues.
(Source: Atlassian Support Documentation, "Configure issue security schemes")
As a new project role (Option C) :
Project roles are used in permission schemes to grant permissions within projects. While a new project role (e.g., “Customer Support Role”) could be created and added to the Browse Projects permission, this would require adding the role to each project’s role membership, which is inefficient for hundreds of projects. A group is more practical, as it can be added once to the shared permission scheme. Project roles also do not directly address global permissions like Share dashboards and filters .
Extract from Documentation :
Project roles are project-specific and require membership configuration in each project. Groups are more efficient for permissions across multiple projects with a shared scheme.
(Source: Atlassian Support Documentation, "Manage project roles")
As a new permission (Option D) :
Creating a new permission is not a valid option in Jira, as permissions are predefined (e.g., Browse Projects , Edit Issues ). The requirement is met by granting existing permissions ( Browse Projects , Share dashboards and filters ) to a group, not by creating a new permission type.
Extract from Documentation :
Jira permissions are fixed and cannot be extended with new permission types. Use existing permissions in permission schemes or global permissions.
(Source: Atlassian Support Documentation, "Manage permissions in Jira Cloud")
Additional Notes :
Steps to configure :
Create a “Customer Support” group in Settings > User management > Groups .
Add customer support staff to the group.
Add the group to the Browse Projects permission in the shared permission scheme ( Settings > Issues > Permission schemes ).
Add the group to the Share dashboards and filters global permission ( Settings > System > Global permissions ).
This approach requires Jira administrator privileges to manage groups and permissions.
A group is more scalable than a project role for hundreds of projects, as it avoids per-project configuration.
Users complain that they can see a particular custom field in all company-managed projects except one. Identify two possible reasons. (Choose two.)
Groups
Project roles
Security levels
Screen
Issue layout
Validator
Step property
The issue is that a custom field is visible in all company-managed projects except one, indicating a project-specific configuration is preventing the field from being displayed. The two possible reasons are Screen (Option D) and Issue layout (Option E), as these configurations control whether a field appears in a project’s issue operations or view.
Explanation of the Correct Answers :
Screen (Option D) :
In company-managed projects, screens determine which fields are displayed during issue operations (Create, Edit, View) for specific issue types, as defined by the screen scheme . If the custom field is not included on the screen(s) used by the problematic project’s issue types, users will not see the field when creating, editing, or viewing issues in that project. This could explain why the field is missing in one project but visible in others.
Exact Extract from Documentation :
Configure screens in company-managed projects
Screens define which fields are available during issue operations (Create, Edit, View). Each project uses a screen scheme to map screens to issue types and operations.
If a field is not on a project’s screen:
Users cannot see or interact with the field in that project. To check:
Go to Project settings > Screens .
Verify if the custom field is included on the relevant screens. Note : A field must be on the screen to be visible during issue operations. (Source: Atlassian Support Documentation, "Configure screens in Jira Cloud")
Why This Fits : If the custom field is not on the screen(s) used by the project, it will not be visible, making Screen a possible reason for the issue.
Issue layout (Option E) :
The issue layout in a company-managed project controls which fields are displayed, hidden, or placed in the context panel in the issue view. If the custom field is moved to the Hidden fields section in the issue layout for the problematic project, users will not see it when viewing issues, even if the field is on the screen and contains data. This could explain the field’s absence in one project.
Exact Extract from Documentation :
Configure issue layouts in company-managed projects
Issue layouts determine which fields are displayed or hidden in the issue view.
To hide a field:
Go to Project settings > Issue layout .
Move the field to the Hidden fields section. Impact : Hidden fields are not shown in the issue view, even if they are on the screen and have values. Note : Issue layouts are project-specific and can differ between projects. (Source: Atlassian Support Documentation, "Configure issue layouts in Jira Cloud")
Why This Fits : If the custom field is hidden in the issue layout for the problematic project, it will not be visible in the issue view, making Issue layout a possible reason.
Why Other Options Are Incorrect :
Groups (Option A) :
Groups are used in permission schemes or field configurations to control access or behavior, but they do not directly determine field visibility. If the field is visible in other projects, the issue is not group-related, as groups apply globally or via schemes shared across projects.
Extract from Documentation :
Groups are used for permissions or field restrictions, not for controlling field visibility on screens or layouts.
(Source: Atlassian Support Documentation, "Manage groups in Jira Cloud")
Project roles (Option B) :
Project roles are used in permission schemes to grant permissions (e.g., Edit Issues ). They do not control whether a field is displayed on a screen or in the issue layout. The issue is about visibility, not permissions.
Extract from Documentation :
Project roles manage permissions, not field visibility. Check screens or issue layouts for display issues.
(Source: Atlassian Support Documentation, "Manage project roles")
Security levels (Option C) :
Security levels (part of an issue security scheme) restrict which issues a user can view, not which fields are displayed within an issue. If users can see issues but not the field, security levels are not the cause.
Extract from Documentation :
Issue security levels control issue visibility, not field visibility within an issue.
(Source: Atlassian Support Documentation, "Configure issue security schemes")
Validator (Option F) :
Validators ensure conditions are met before a workflow transition (e.g., a field is filled). They do not affect whether a field is visible in the issue view or during operations.
Extract from Documentation :
Validators enforce conditions during transitions, not field visibility.
(Source: Atlassian Support Documentation, "Configure advanced work item workflows")
Step property (Option G) :
Step properties (workflow properties) control behaviors like editability in a status (e.g., jira.issue.editable ). They do not directly control field visibility on screens or in the issue view.
Extract from Documentation :
Workflow properties manage status behaviors, not field visibility. Use screens or issue layouts for display issues.
(Source: Atlassian Support Documentation, "Use workflow properties")
Additional Notes :
To resolve the issue, check:
Project settings > Screens : Ensure the custom field is on the relevant screen(s) for the project’s issue types.
Project settings > Issue layout : Verify the field is not in the Hidden fields section.
These configurations require project admin (for issue layout) or Jira administrator (for screens) privileges.
Other potential causes (not listed) include field configurations (if the field is hidden for all issue types in the project), but screens and issue layouts are the most direct reasons.
In project ENG, components are configured as shown:
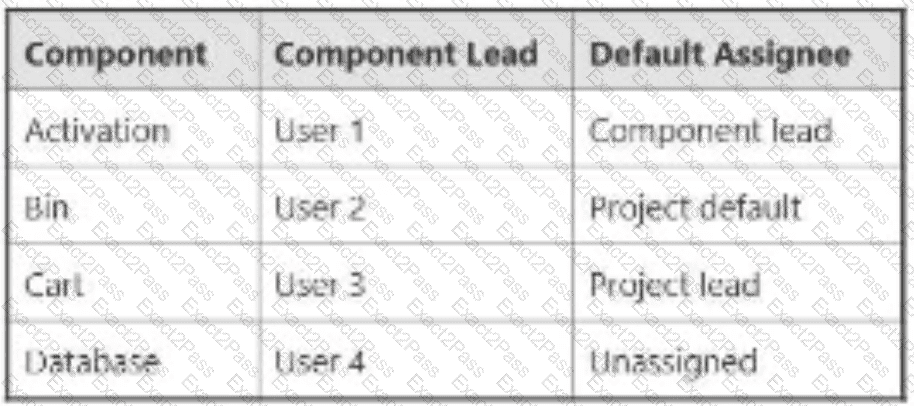
The Default Assignee for ENG is the Project Lead. You select all four components on a new issue and leave Assignee as Automatic. To whom will the issue be assigned?
User 1
User 2
User 3
User 4
Project Lead
Unassigned
In Jira Software Cloud, the Assignee field for a new issue can be set to Automatic , in which case Jira determines the assignee based on the project’s Default Assignee setting and any component-specific Default Assignee settings. The issue in the ENG project has all four components selected (Activation, Bin, Cart, Database), and the Assignee is left as Automatic . The issue will be assigned to the Project Lead (Option E) due to the rules for handling multiple components with conflicting default assignees.
Explanation of the Correct Answer (Option E) :
Project Default Assignee : The project ENG has its Default Assignee set to the Project Lead , meaning that if no component-specific assignee is determined, the issue will be assigned to the Project Lead.
Component Default Assignees :
Activation : Default Assignee is Component lead (User 1).
Bin : Default Assignee is Project default (Project Lead).
Cart : Default Assignee is Component lead (User 3).
Database : Default Assignee is Unassigned .
Automatic Assignment Logic with Multiple Components : When an issue has multiple components selected, Jira evaluates the Default Assignee for each component:
If all components have the same default assignee, that user is assigned.
If components have different default assignees (or some are unassigned), Jira falls back to the project’s Default Assignee (Project Lead in this case).
In this scenario:
Activation assigns to User 1.
Bin assigns to the Project Lead (via project default).
Cart assigns to User 3.
Database assigns to Unassigned.
Since the components have conflicting default assignees (User 1, Project Lead, User 3, Unassigned), Jira cannot resolve to a single assignee and uses the project’s Default Assignee , which is the Project Lead .
Exact Extract from Documentation :
Configure default assignees
The Default Assignee for a project or component determines who is assigned to new issues when the Assignee field is set to Automatic .
Multiple components :
If an issue has multiple components with different default assignees, Jira assigns the issue to the project’s Default Assignee . To configure:
Go to Project settings > Components to set component default assignees.
Go to Project settings > Details to set the project’s Default Assignee . Note : The project’s Default Assignee is used when component assignees conflict. (Source: Atlassian Support Documentation, "Manage project settings in Jira Cloud")
Why This Fits : With conflicting default assignees across the four components, Jira assigns the issue to the project’s Default Assignee , which is the Project Lead , making Option E the correct answer.
Why Other Options Are Incorrect :
User 1 (Option A) :
User 1 is the default assignee for the Activation component (as the Component lead). However, with multiple components selected and different assignees (User 1, Project Lead, User 3, Unassigned), Jira falls back to the project’s Default Assignee (Project Lead), not User 1.
Extract from Documentation :
If multiple components have different default assignees, the project’s Default Assignee is used, not a component-specific assignee.
(Source: Atlassian Support Documentation, "Manage project settings in Jira Cloud")
User 2 (Option B) :
User 2 is the Component lead for Bin , but the default assignee for Bin is set to Project default (Project Lead), not the Component lead. Even if it were User 2, the conflicting assignees across components would result in the Project Lead being assigned.
Extract from Documentation :
The Project default setting for a component assigns issues to the project’s Default Assignee , not the Component lead.
(Source: Atlassian Support Documentation, "Manage components in Jira Cloud")
User 3 (Option C) :
User 3 is the default assignee for the Cart component (as the Component lead). However, the conflicting assignees across components (User 1, Project Lead, User 3, Unassigned) result in the Project Lead being assigned, not User 3.
Extract from Documentation :
Conflicting component assignees result in the project’s Default Assignee being used.
(Source: Atlassian Support Documentation, "Manage project settings in Jira Cloud")
User 4 (Option D) :
User 4 is the Component lead for Database , but the default assignee for Database is Unassigned , not User 4. Even if it were User 4, the conflicting assignees would result in the Project Lead being assigned.
Extract from Documentation :
The Unassigned default assignee for a component does not override the project’s Default Assignee in conflicts.
(Source: Atlassian Support Documentation, "Manage components in Jira Cloud")
Unassigned (Option F) :
While the Database component has a default assignee of Unassigned , the presence of other components with different assignees (User 1, Project Lead, User 3) creates a conflict, and Jira assigns the issue to the Project Lead, not Unassigned .
Extract from Documentation :
Unassigned as a default assignee is overridden by the project’s Default Assignee in cases of conflict.
(Source: Atlassian Support Documentation, "Manage project settings in Jira Cloud")
Additional Notes :
The Default Assignee for the project is set in Project settings > Details , and component-specific default assignees are set in Project settings > Components .
The user creating the issue must have the Assign Issues permission, and the Project Lead must have the Assignable User permission to be assigned.
If only one component were selected (e.g., Activation), the issue would be assigned to User 1, but selecting all four components triggers the conflict resolution to the Project Lead.
You are the project administrator in a team-managed project and a company-managed project. You have no other administrative privileges. Identify the action you definitely cannot perform in a company-managed project.
Restrict who can see certain issues.
Restrict who can use workflow transitions.
Manage project access.
Manage notifications and recipients.
Create automation rules.
As a project administrator in a company-managed project with no other administrative privileges (e.g., Jira admin or system admin), your permissions are limited to specific project-level settings defined by the permission scheme and other configurations. The action you definitely cannot perform in a company-managed project is restrict who can use workflow transitions (Option B), as this requires editing the workflow, which is a Jira admin privilege.
Explanation of the Correct Answer (Option B) :
Restricting who can use workflow transitions involves adding conditions to transitions in a workflow (e.g., restricting a transition to specific users, roles, or groups). In company-managed projects, workflows are managed at the system level, and editing them requires Jira admin permissions. Project admins cannot modify workflows or their conditions.
Exact Extract from Documentation :
Edit workflows in company-managed projects
Workflows define the statuses and transitions for issues in a project. To edit a workflow (e.g., add conditions, validators, or post functions):
Go to Settings > Issues > Workflows .
Select the workflow and make changes. Note : Only Jira administrators can edit workflows. Project administrators can view the workflow in Project settings > Workflows but cannot modify it. To restrict transitions, add conditions like "Only users in a specific role" or "Only the assignee." (Source: Atlassian Support Documentation, "Configure advanced work item workflows")
Why This Fits : As a project admin in a company-managed project, you lack the permission to edit workflows, including adding conditions to restrict who can use transitions. This makes Option B the action you definitely cannot perform.
Why Other Options Are Incorrect :
Restrict who can see certain issues (Option A) :
Project admins in company-managed projects can restrict who can see issues by configuring issue security levels (if an issue security scheme is assigned to the project). They can manage security levels in Project settings > Issue security and assign users, roles, or groups to specific levels.
Extract from Documentation :
Configure issue security
Issue security levels restrict who can view issues. Project administrators can manage security levels in Project settings > Issue security , provided an issue security scheme is assigned to the project.
(Source: Atlassian Support Documentation, "Configure issue security schemes")
Manage project access (Option C) :
Project admins can manage project access by adding or removing users, groups, or roles in Project settings > People . This controls who has access to the project based on the permission scheme’s Browse Projects permission.
Extract from Documentation :
Manage project access
Project administrators can add or remove users, groups, or roles in Project settings > People to control project access, as defined by the permission scheme.
(Source: Atlassian Support Documentation, "Manage project permissions")
Manage notifications and recipients (Option D) :
Project admins can manage notifications by configuring the notification scheme in Project settings > Notifications (if permitted by the permission scheme). They can add or remove recipients for events, such as users, roles, or groups.
Extract from Documentation :
Configure notifications
Project administrators can edit the notification scheme in Project settings > Notifications to define who receives notifications for specific events, provided they have the Administer Projects permission.
(Source: Atlassian Support Documentation, "Configure notification schemes")
Create automation rules (Option E) :
Project admins can create project-level automation rules in company-managed projects using Project settings > Automation . These rules are limited to the project and do not require Jira admin permissions.
Extract from Documentation :
Create automation rules
Project administrators can create automation rules in Project settings > Automation to automate tasks within their project. Global automation rules require Jira admin permissions, but project-level rules do not.
(Source: Atlassian Support Documentation, "Automate your Jira Cloud instance")
Additional Notes :
In team-managed projects , project admins have broader control, including the ability to configure workflows and restrict transitions, as workflows are project-specific. However, the question specifies a company-managed project , where workflow management is restricted to Jira admins.
The Administer Projects permission (granted to project admins) allows managing most project settings, but workflow editing is a system-level task requiring higher privileges.
You renamed a status in the workflow of a team-managed project. Which statement is true?
The status will be renamed in all team-managed workflows.
Workflow rules that reference the status must be updated.
Transitions coming into that status must be updated.
Saved filters that reference the status must be updated.
The status will be renamed on the Status page in Jira administration.
Renaming a status in a team-managed project’s workflow affects only that project’s workflow, as statuses in team-managed projects are project-specific. The primary impact is that saved filters that reference the status must be updated (Option D), as JQL queries in filters use status names and will no longer return correct results if the status name changes.
Explanation of the Correct Answer (Option D) :
In Jira, saved filters often use JQL queries that reference status names (e.g., status = "In Progress"). If a status is renamed in a team-managed project’s workflow (e.g., from “In Progress” to “Active”), any filters referencing the old status name will no longer include issues in the renamed status. These filters must be updated to use the new status name.
Exact Extract from Documentation :
Manage statuses in team-managed projects
Statuses in team-managed projects are project-specific and edited in Project settings > Workflow . Renaming a status changes its name for that project’s issues.
Impact : JQL queries in filters, boards, or dashboards that reference the status name (e.g., status = "In Progress") will no longer match issues in the renamed status. Update these queries to use the new status name.
(Source: Atlassian Support Documentation, "Configure workflows in team-managed projects")
Why This Fits : Renaming a status affects JQL-based filters that explicitly reference the status, requiring updates to reflect the new name, making Option D the correct answer.
Why Other Options Are Incorrect :
The status will be renamed in all team-managed workflows (Option A) :
Statuses in team-managed projects are project-specific, not shared across projects. Renaming a status in one project’s workflow does not affect other team-managed projects.
Extract from Documentation :
Each team-managed project has its own workflow and statuses, independent of other projects. Changes to a status in one project do not affect others.
(Source: Atlassian Support Documentation, "Configure workflows in team-managed projects")
Workflow rules that reference the status must be updated (Option B) :
Workflow rules in team-managed projects (e.g., transition restrictions, field updates) reference statuses by their internal IDs or context, not their display names. Renaming a status does not break these rules, so they do not need updating.
Extract from Documentation :
Workflow rules in team-managed projects are tied to status IDs, not names. Renaming a status does not require updating rules.
(Source: Atlassian Support Documentation, "Configure workflows in team-managed projects")
Transitions coming into that status must be updated (Option C) :
Transitions in a workflow reference statuses by their internal IDs or context, not their display names. Renaming a status does not affect the transitions pointing to it, so no updates are needed.
Extract from Documentation :
Transitions are linked to statuses by internal IDs. Renaming a Bedrock status does not affect transition configurations.
(Source: Atlassian Support Documentation, "Configure workflows in team-managed projects")
The status will be renamed on the Status page in Jira administration (Option E) :
The Status page in Jira administration ( Settings > Issues > Statuses ) manages global statuses used in company-managed projects. Team-managed project statuses are project-specific and do not appear on or affect the global Status page.
Extract from Documentation :
Statuses in team-managed projects are project-specific and not listed in Settings > Issues > Statuses , which is for company-managed projects.
(Source: Atlassian Support Documentation, "Manage statuses in Jira Cloud")
Additional Notes :
Renaming a status in a team-managed project is done in Project settings > Workflow and requires project admin privileges.
To minimize filter issues, use status IDs in JQL queries (e.g., status = 10001), but this is less common than using names.
Boris is reviewing his assigned issues. He wants to move them from the backlog into a planned sprint so he can work on them. Which two permissions does he need? (Choose two.)
Work On Issues
Schedule Issues
Move Issues
Edit Issues
Manage Sprints
Assignable User
To move issues from the backlog to a planned sprint in a Jira Software Cloud project, Boris needs permissions to modify the issue’s sprint field and edit the issue itself. The two permissions required are Schedule Issues (Option B) and Edit Issues (Option D).
Explanation of the Correct Answers :
Schedule Issues (Option B) :
The Schedule Issues permission allows a user to add issues to a sprint, remove issues from a sprint, or move issues between sprints. This permission is necessary to move issues from the backlog (which is not part of a sprint) into a planned sprint.
Exact Extract from Documentation :
Schedule Issues permission
The Schedule Issues permission allows users to:
Add issues to a sprint.
Remove issues from a sprint.
Move issues between sprints or to the backlog. This permission is required to manage the sprint field in issues, such as moving an issue from the backlog to a planned sprint. Note : This permission is granted via the project’s permission scheme. (Source: Atlassian Support Documentation, "Manage permissions in Jira Cloud")
Why This Fits : Moving an issue to a planned sprint involves updating the Sprint field, which requires the Schedule Issues permission.
Edit Issues (Option D) :
The Edit Issues permission allows a user to modify issue fields, including the Sprint field. Without this permission, Boris cannot edit the issue to set its sprint, even if he has the Schedule Issues permission.
Exact Extract from Documentation :
Edit Issues permission
The Edit Issues permission allows users to modify issue fields, such as Summary, Description, or Sprint. This permission is required to update an issue’s details, including moving it to a sprint if combined with the Schedule Issues permission.
Note : This permission is granted via the project’s permission scheme.
(Source: Atlassian Support Documentation, "Manage permissions in Jira Cloud")
Why This Fits : Editing the Sprint field to move an issue into a planned sprint requires the Edit Issues permission, as it involves modifying the issue’s metadata.
Why Other Options Are Incorrect :
Work On Issues (Option A) :
The Work On Issues permission allows users to log work on issues (e.g., record time spent). It is not related to moving issues to a sprint or editing issue fields.
Extract from Documentation :
Work On Issues permission
Allows users to log work on issues using the time tracking feature. This does not include editing issue fields or managing sprints.
(Source: Atlassian Support Documentation, "Manage permissions in Jira Cloud")
Move Issues (Option C) :
The Move Issues permission allows users to move issues between projects or change their issue type within the same project. Moving an issue to a sprint does not involve changing its project or issue type, so this permission is not required.
Extract from Documentation :
Move Issues permission
Allows users to move issues to a different project or change their issue type. This is not required for moving issues to a sprint within the same project.
(Source: Atlassian Support Documentation, "Manage permissions in Jira Cloud")
Manage Sprints (Option E) :
The Manage Sprints permission allows users to create, start, complete, or delete sprints. While this permission is necessary for managing the sprint itself, it is not required to move issues into a planned sprint, as Boris is not creating or modifying the sprint.
Extract from Documentation :
Manage Sprints permission
Allows users to create, start, complete, or delete sprints. Moving issues to an existing sprint requires the Schedule Issues and Edit Issues permissions, not Manage Sprints .
(Source: Atlassian Support Documentation, "Manage permissions in Jira Cloud")
Assignable User (Option F) :
The Assignable User permission allows a user to be assigned to issues (i.e., set as the Assignee). It does not affect the ability to move issues to a sprint.
Extract from Documentation :
Assignable User permission
Allows users to be set as the assignee of an issue. This does not include editing other fields like the Sprint field.
(Source: Atlassian Support Documentation, "Manage permissions in Jira Cloud")
Additional Notes :
Boris likely already has the Browse Projects permission, as he can review his assigned issues. The Schedule Issues and Edit Issues permissions are specifically required for the action of moving issues to a sprint.
These permissions are granted via the project’s permission scheme, which can be checked in Project settings > Permissions .
Two users have access to the same filter and see the same issues in a company-managed project. One of them can perform a bulk operation to watch issues in the filter, but the other user cannot. What should you investigate?
Project permissions
Product access
Groups
Default user preferences
Project roles
The scenario describes two users who can view the same issues in a filter (indicating they have the Browse Projects permission), but only one can perform a bulk operation to watch issues. The ability to watch issues is controlled by the View Issue Watchers and Manage Watcher List permissions in the project’s permission scheme. Therefore, you should investigate project permissions (Option A).
Explanation of the Correct Answer (Option A) :
Performing a bulk operation to watch issues requires the Manage Watcher List permission, which allows users to add themselves or others as watchers to an issue. Since both users can see the issues (via the filter), they likely have the Browse Projects permission, but the user who cannot perform the bulk operation may lack the Manage Watcher List permission.
Exact Extract from Documentation :
Manage Watcher List permission
The Manage Watcher List permission allows users to add or remove watchers from an issue, including via bulk operations. This permission is granted via the project’s permission scheme.
Note : To view the watcher list, users also need the View Issue Watchers permission. Both permissions are required to perform actions like bulk watching issues.
To check permissions:
Go to Project settings > Permissions .
Review the Manage Watcher List and View Issue Watchers permissions to see which users, groups, or roles have them. (Source: Atlassian Support Documentation, "Manage permissions in Jira Cloud")
Why This Fits : The difference in the users’ ability to perform the bulk watch operation is most likely due to a difference in their Manage Watcher List permission, which is defined in the project’s permission scheme. Investigating project permissions will reveal whether the second user lacks this permission.
Why Other Options Are Incorrect :
Product access (Option B) :
Product access determines whether users can use Jira Software. Both users can view the filter and issues, indicating they have product access. Product access does not control specific permissions like managing watchers.
Extract from Documentation :
Manage product access
Product access grants users the ability to use Jira products. Specific actions, like managing watchers, are controlled by project or global permissions, not product access.
(Source: Atlassian Support Documentation, "Manage product access")
Groups (Option C) :
Groups may be used in permission schemes to grant permissions, but the root cause is the permission itself, not the group membership. Investigating groups might be a secondary step after checking project permissions, but project permissions is the more direct answer.
Extract from Documentation :
Groups are used in permission schemes to grant permissions to multiple users. To determine why a user lacks a permission, check the permission scheme first, then verify group membership if relevant.
(Source: Atlassian Support Documentation, "Manage groups")
Default user preferences (Option D) :
Default user preferences (e.g., notification settings) control whether a user receives notifications for watched issues, not their ability to watch issues. The issue is about performing a bulk operation, not receiving notifications.
Extract from Documentation :
Manage user preferences
Users can manage their notification preferences in Personal settings > Email notifications . These settings affect notification delivery, not the ability to perform actions like watching issues.
(Source: Atlassian Support Documentation, "Manage your Jira notification emails")
Project roles (Option E) :
Project roles are used in permission schemes to grant permissions. Like groups, roles are a means to assign permissions, but the issue lies in the permission itself ( Manage Watcher List ). Investigating project permissions directly addresses the root cause.
Extract from Documentation :
Project roles are used in permission schemes to grant permissions like Manage Watcher List . Check the permission scheme to identify the root cause of permission differences.
(Source: Atlassian Support Documentation, "Manage project roles")
Additional Notes :
Both users can see the filter and issues, so they likely have the Browse Projects permission. The difference in their ability to perform the bulk watch operation points to the Manage Watcher List permission, which should be checked in Project settings > Permissions .
If the permission is granted to a group or role, verify the users’ membership in those groups or roles as a follow-up step.
An excerpt of the DEV permission scheme is shown:
Project Permissions | Users / Groups / Project Roles
Administer Projects | Project Role (Administrators)
View Development Tools | Project Role (Core), Project Role (Sprint Team)
Manage Sprints | Project Role (atlassian-addons-project-access), Project Role (Core)
Ahmed is a project administrator in DEV and not a Jira administrator. He is unable to create sprints in DEV. What should Ahmed do?
Add himself to the Core project role
Add himself to the Sprint Team project role
Add the Administrators project role to the ‘View Development Tools’ permission
Add the Administrators project role to the ‘Manage Sprints’ permission
Ahmed is a project administrator in the DEV project, which means he is in the Administrators project role (as per the permission scheme, where Administer Projects is granted to this role). However, he cannot create sprints because he lacks the Manage Sprints permission, which is granted to the atlassian-addons-project-access and Core project roles. To resolve this, Ahmed should add the Administrators project role to the ‘Manage Sprints’ permission (Option D).
Explanation of the Correct Answer (Option D) :
The Manage Sprints permission allows users to create, start, complete, or delete sprints in a project. According to the permission scheme, this permission is granted to the atlassian-addons-project-access and Core project roles, but not to the Administrators project role, which Ahmed belongs to.
As a project administrator, Ahmed has the Administer Projects permission, which allows him to modify the project’s permission scheme (via Project settings > Permissions ) and add the Administrators project role to the Manage Sprints permission. This will grant him the ability to create sprints without needing Jira administrator privileges.
Exact Extract from Documentation :
Manage Sprints permission
The Manage Sprints permission allows users to create, start, complete, or delete sprints in a project. This permission is granted via the project’s permission scheme.
To update permissions:
Go to Project settings > Permissions .
Edit the permission scheme and add a user, group, or project role (e.g., Administrators) to the Manage Sprints permission. Note : Project administrators can modify the permission scheme for their project if they have the Administer Projects permission. (Source: Atlassian Support Documentation, "Manage permissions in Jira Cloud")
Why This Fits : Adding the Administrators project role to the Manage Sprints permission directly addresses Ahmed’s lack of permission to create sprints, leveraging his existing project administrator privileges.
Why Other Options Are Incorrect :
Add himself to the Core project role (Option A) :
Adding himself to the Core project role would grant Ahmed the Manage Sprints permission, as this role is listed for that permission. However, as a project administrator, Ahmed can modify the permission scheme directly instead of adding himself to another role, which may grant unnecessary permissions (e.g., View Development Tools ). Option D is more appropriate, as it aligns with his administrative role.
Extract from Documentation :
Project roles are managed in Project settings > People . Adding a user to a role grants all permissions associated with that role, which may include more than needed.
(Source: Atlassian Support Documentation, "Manage project roles")
Add himself to the Sprint Team project role (Option B) :
The Sprint Team project role is only listed for the View Development Tools permission, not Manage Sprints . Adding himself to this role would not grant Ahmed the ability to create sprints.
Extract from Documentation :
Permissions are granted to specific roles or groups in the permission scheme. Verify the roles assigned to each permission before adding users.
(Source: Atlassian Support Documentation, "Manage permissions in Jira Cloud")
Add the Administrators project role to the ‘View Development Tools’ permission (Option C) :
The View Development Tools permission allows users to view development-related information (e.g., commits, builds). It is unrelated to creating sprints, so adding the Administrators role to this permission would not help Ahmed.
Extract from Documentation :
The View Development Tools permission grants access to development information, not sprint management.
(Source: Atlassian Support Documentation, "Manage permissions in Jira Cloud")
Additional Notes :
Ahmed’s ability to modify the permission scheme depends on his Administer Projects permission, which is confirmed by his role as a project administrator.
The atlassian-addons-project-access role is typically used for system or app-related permissions and is not relevant for Ahmed to modify.
After adding the Administrators role to Manage Sprints , Ahmed and other administrators will gain sprint management capabilities.
An automation rule is configured as shown:
When: Rule is triggered on All comments
If: Initiator is in Developers
Then: Transition the issue to DEVELOPMENT
If: Initiator is in Reviewers
Then: Transition the issue to REVIEW You are only in the Reviewers project role. What happens when you comment on an issue?
The rule does not execute.
The issue transitions to REVIEW.
The rule executes but does not perform any actions.
The issue transitions to DEVELOPMENT.
The automation rule is triggered when any comment is added to an issue and checks the initiator’s project role to determine the action. Since you are only in the Reviewers project role, commenting on an issue will trigger the rule, and the issue will transition to REVIEW based on the rule’s logic.
Explanation of the Correct Answer (Option B) :
The rule is triggered by All comments , meaning any comment on an issue activates the rule.
The rule has two If conditions:
If the initiator (the user who commented) is in the Developers project role, the issue transitions to DEVELOPMENT .
If the initiator is in the Reviewers project role, the issue transitions to REVIEW .
Since you are only in the Reviewers project role, the second If condition is met when you comment, and the Then action transitions the issue to REVIEW .
Exact Extract from Documentation :
Configure automation rules
Automation rules consist of triggers, conditions, and actions.
Trigger : Defines when the rule runs (e.g., Comment Added).
Condition : Checks criteria like user roles (e.g., Initiator is in Reviewers).
Action : Performs tasks like transitioning an issue. Conditions are evaluated sequentially, and the corresponding action is executed if the condition is met. If multiple conditions apply, each matching condition’s action is executed unless restricted by rule logic. Note : The initiator is the user who triggers the rule (e.g., the commenter). (Source: Atlassian Support Documentation, "Automate your Jira Cloud instance")
Why This Fits : As a member of the Reviewers project role, your comment satisfies the If: Initiator is in Reviewers condition, triggering the Transition the issue to REVIEW action, making Option B the correct answer.
Why Other Options Are Incorrect :
The rule does not execute (Option A) :
The rule is triggered by All comments , so any comment, including yours, will execute the rule. The issue is not whether the rule executes but what action it performs.
Extract from Documentation :
A Comment Added trigger activates the rule whenever a comment is added to an issue, regardless of the user’s role.
(Source: Atlassian Support Documentation, "Jira automation triggers")
The rule executes but does not perform any actions (Option C) :
The rule executes and performs the Transition the issue to REVIEW action because you are in the Reviewers project role, which satisfies the second If condition. The rule will not skip actions if a condition is met.
Extract from Documentation :
If a condition in an automation rule is met, the associated action is executed unless restricted by additional logic.
(Source: Atlassian Support Documentation, "Automate your Jira Cloud instance")
The issue transitions to DEVELOPMENT (Option D) :
The DEVELOPMENT transition is only triggered if the initiator is in the Developers project role. Since you are only in the Reviewers role, this condition is not met, and the issue will not transition to DEVELOPMENT .
Extract from Documentation :
Conditions like Initiator is in [Role] check the user’s project role membership. Only the actions for matching conditions are executed.
(Source: Atlassian Support Documentation, "Jira automation conditions")
Additional Notes :
The rule assumes the DEVELOPMENT and REVIEW statuses exist in the project’s workflow and that transitions to these statuses are valid from the issue’s current status.
If you were in both Developers and Reviewers roles, both actions could execute sequentially, but the question specifies you are only in Reviewers , so only the REVIEW transition applies.
You need to create an automation rule as follows:
When a Story is updated
If it is unestimated
Comment on its Sub-tasks Which two rule elements are needed in this rule? (Choose two.)
Branch rule on Sub-tasks
Issue fields condition on whether Story Points is empty
Related issues condition on Issues in the sprint
Branch rule on Stories
To create an automation rule that triggers when a Story is updated, checks if it is unestimated (i.e., has no Story Points), and comments on its Sub-tasks, the rule requires a Branch rule on Sub-tasks to target the Sub-tasks and an Issue fields condition on whether Story Points is empty to check the unestimated status. These two elements are essential to meet the rule’s requirements.
Explanation of the Correct Answers :
Branch rule on Sub-tasks (Option A) :
The rule needs to comment on the Sub-tasks of the updated Story. A Branch rule is used in Jira automation to perform actions on related issues, such as Sub-tasks. The Branch rule on Sub-tasks allows the rule to iterate over each Sub-task of the Story and execute the comment action.
Exact Extract from Documentation :
Branch rule / related issues
A branch rule allows actions to be performed on issues related to the trigger issue, such as Sub-tasks, Epics, or linked issues.
To comment on Sub-tasks:
Add a Branch rule / related issues component.
Select Sub-tasks as the related issue type.
Add a Comment on issue action within the branch to comment on each Sub-task. Note : The branch rule processes each related issue individually. (Source: Atlassian Support Documentation, "Jira automation actions")
Why This Fits : The Branch rule on Sub-tasks is necessary to target the Sub-tasks of the Story and apply the comment action, satisfying the requirement to comment on Sub-tasks.
Issue fields condition on whether Story Points is empty (Option B) :
The rule must check if the Story is unestimated, meaning the Story Points field is empty (null or not set). The Issue fields condition allows checking the value of a field, such as Story Points , to ensure it meets a condition (e.g., is empty).
Exact Extract from Documentation :
Issue fields condition
The Issue fields condition checks the value of an issue field against a specified criterion.
To check if Story Points is empty:
Add an Issue fields condition .
Select Story Points as the field.
Set the condition to is empty . Note : This condition ensures the rule only proceeds if the field has no value. (Source: Atlassian Support Documentation, "Jira automation conditions")
Why This Fits : The Issue fields condition on whether Story Points is empty ensures the rule only comments on Sub-tasks if the Story is unestimated, satisfying the condition requirement.
Why Other Options Are Incorrect :
Related issues condition on Issues in the sprint (Option C) :
A Related issues condition checks if related issues (e.g., Sub-tasks, Epics) meet certain criteria. The requirement does not involve checking the sprint status of issues, only that the Story is unestimated and comments are added to Sub-tasks. This condition is irrelevant to the rule.
Extract from Documentation :
The Related issues condition checks if related issues meet a condition (e.g., all Sub-tasks are resolved). It is not needed for commenting on Sub-tasks without additional criteria.
(Source: Atlassian Support Documentation, "Jira automation conditions")
Branch rule on Stories (Option D) :
A Branch rule on Stories would target Stories, not Sub-tasks. Since the rule needs to comment on the Sub-tasks of the updated Story, a branch on Sub-tasks (Option A) is required, not Stories.
Extract from Documentation :
A Branch rule targets specific related issues (e.g., Sub-tasks, Epics). Choose the correct issue type to match the action (e.g., Sub-tasks for commenting on Sub-tasks).
(Source: Atlassian Support Documentation, "Jira automation actions")
Additional Notes :
The complete rule would look like this:
Trigger : Issue Updated (filter to Story issue type).
Condition : Issue fields condition (Story Points is empty).
Action : Branch rule on Sub-tasks.
Action : Comment on issue (add the desired comment).
The rule assumes the Story Points field is available and Sub-tasks exist for the Story.
The rule can be configured in Project settings > Automation (for project-level rules) or Settings > System > Automation rules (for global rules).