Last Update 8 hours ago Total Questions : 109
The Workday Pro Integrations Certification Exam content is now fully updated, with all current exam questions added 8 hours ago. Deciding to include Workday-Pro-Integrations practice exam questions in your study plan goes far beyond basic test preparation.
You'll find that our Workday-Pro-Integrations exam questions frequently feature detailed scenarios and practical problem-solving exercises that directly mirror industry challenges. Engaging with these Workday-Pro-Integrations sample sets allows you to effectively manage your time and pace yourself, giving you the ability to finish any Workday Pro Integrations Certification Exam practice test comfortably within the allotted time.
How many integration systems can an ISU be assigned to concurrently?
You have been asked to create a report that will be used by the EIB to output only workers with Child Dependents.
How do you configure the custom report to meet these requirements?
What is the relationship between an ISU (Integration System User) and an ISSG (Integration System Security Group)?
A calculated field used as a field override in a Connector is not appearing in the output. Assuming the field has a value, what could cause this to occur?
Refer to the scenario. You are configuring a Core Connector: Worker integration with the Data Initialization Service (DIS) enabled. The integration must extract worker contact details and job information, including a calculated field override that determines phone allowance eligibility.
When testing, you run the Test Security Related Action from the Configure Integration Field Override step. Several field overrides display “No” in the Available by User column.
To ensure the ISSG has access to these field overrides and that “Yes” is displayed in the Test Security step, what configuration should you review?
You are creating an outbound connector using the Core Connector: Organization Outbound template. The vendor has provided the following requirements for how the data should appear in the output file.
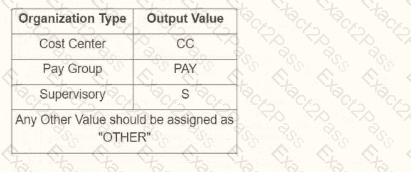
The vendor would also like to change the default document retention policy of 30 days to 7 days. What tasks do you need to use to configure this in your connector?
Refer to the following XML to answer the question below.
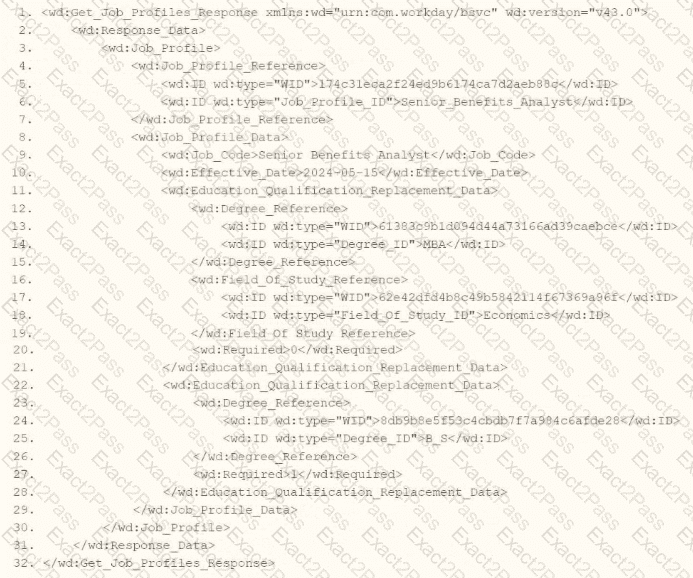
You are an integration developer and need to write XSLT to transform the output of an EIB which is making a request to the Get Job Profiles web service operation. The root template of your XSLT matches on the < wd:Get_Job_Profiles_Response > element. This root template then applies a template against < wd:Job_Profile > .
What XPath syntax would be used to select the value of the wd:Job_Code element when the < xsl:value-of > element is placed within the template which matches on < wd:Job_Profile > ?
Refer to the following scenario to answer the question below.
An external system needs a file containing data for recent worker job changes. They would like to receive a file routinely at 5 PM eastern standard time, every 48 hours. The file should show job changes since the last integration run.
What is the run frequency of the integration schedule?
Refer to the following scenario to answer the question below.
You are configuring a Core Connector: Worker integration to send data to a new external compliance and certification tracking vendor. You have begun to configure the connector with the Data Initialization Service (DIS) enabled. Your goal is to extract worker qualification data, but the vendor has three specific requirements:
The file must only include Active workers who are in the “Clinical Staff” Job Family.
The vendor has specified that for each worker’s Education data, they only want to receive the Institution Name, Institution Type and Degree.
The vendor requires a custom “License ID” that must combine the Certification Name and Issuing State, for example, “RN-CA”. A Calculated Field that provides this custom “License ID” already exists in the tenant.
During testing, using a Full File run, the output file is missing all education-related information, even though you believe you have initially configured field attributes such as Institution Name, Institution Type and Degree in the Configure Integration Field Attributes step. Additionally, you confirmed that the Worker Qualification Data Section is marked as Include in Output.
What should you do to resolve this issue?
What is the purpose of declaring and defining the namespace in an XSLT stylesheet?